
Rejection Blocks: Trading Wick Zones at Support and Resistance
JustWolves is an educational platform and is not a SEBI-registered investment advisor. Trading financial instruments involves significant risk of loss and may not be suitable for all investors. Past performance is not indicative of future results. Read our full disclaimer →
What you'll learn
- A rejection block is the wick area of a candle that rejected a key level, drawn as a zone
- Lower block: from the lowest body edge down to the wick low; upper block: from the highest body edge up to the wick high
- The wick extreme gives a natural, structural place for the stop
- When a later candle wicks into the block without closing through it, many traders re-draw the block to the new wick
- A block expires when price closes beyond its wick extreme
In this article · 17 sections
Wick theory shows that a long wick records a reversal. A rejection block takes the next step: it turns the wick of a candle that rejected a key level into a zone, with a clear edge for the stop and a clear rule for when the zone stops working. This advanced lesson covers how to draw lower and upper blocks, how to update them after tests, and how to manage trades from them.
What You Will Learn
- What a rejection block is
- How to draw lower and upper blocks
- How to re-draw blocks after tests, and when they expire
- Where to place entries and stops
Before You Start
Read Wick Theory and Price Rejection first.
What a Rejection Block Is
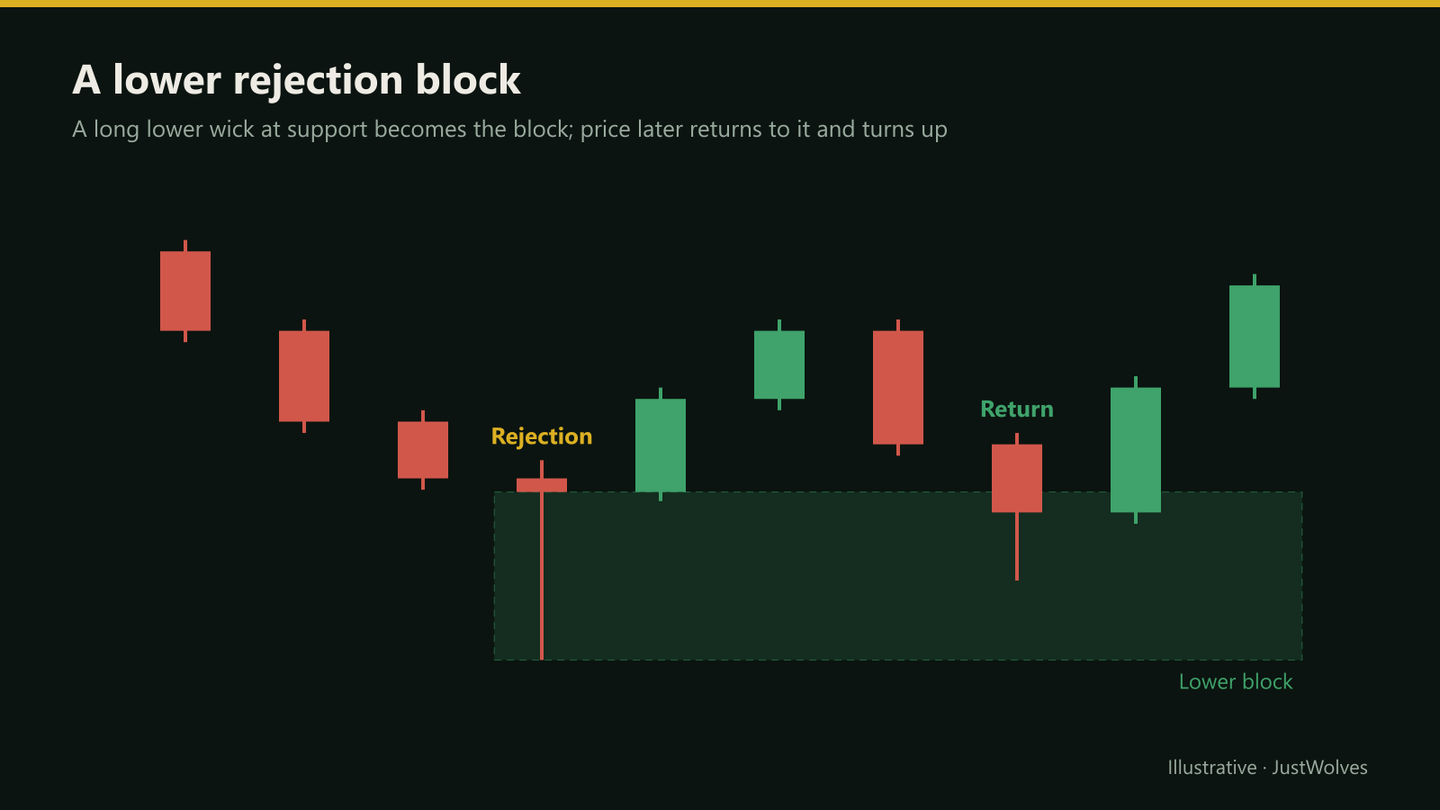
A rejection block is the wick portion of a candle that rejected a significant level, drawn as a rectangle and extended forward in time. It marks where price pushed into a level and was forced back, which some traders expect to matter again when price returns.
There are two kinds: a lower block, from a long lower wick at support, and an upper block, from a long upper wick at resistance.
Drawing the Block
| Block | Inner edge | Outer edge |
|---|---|---|
| Lower block | The lowest body edge of the candle (its open or close, whichever is lower) | The wick low |
| Upper block | The highest body edge of the candle | The wick high |
When Price Returns
- Body closes inside the block, wick doesn't reach the extreme: the block is being tested and is still valid.
- A new wick reaches deeper into the block but the candle closes back above it: many traders re-draw the block to the new candle's body and wick, treating it as the most recent version of the zone.
- A candle closes below the wick low: the block has expired. Stop using it.
Entries, Stops and Targets
| Lower block (long) | Upper block (short) | |
|---|---|---|
| Entry | Price enters the block and prints a reversal candle | Price enters the block and prints a reversal candle |
| Stop | Just below the wick low | Just above the wick high |
| Target | The prior swing high or next resistance | The prior swing low or next support |
A Rejection Block Trade, Step by Step
The chart below follows the practical example in this lesson: the wick at support, the block drawn from it, the return and the trade. Notice that every number in the plan, the zone, the stop and the expiry rule, comes from the original candle.
A lower rejection block at support
Step 1 of 5
A wick at support becomes a block
The stock falls to support near 1,520 and prints a candle with a lower wick from 1,548 (the bottom of the body) down to 1,512. The wick area, 1,512–1,548, is drawn as a lower rejection block and extended to the right.
- What to observe
- Inner edge at the lowest body edge; outer edge at the wick low.
- Condition
- The block is valid until a close below 1,512.
Previous-Day Blocks
A useful intraday application: if the previous day ended with a prominent wick at its high or low, mark that wick as a block before the next session. A return to it the next day, with a reversal on a lower timeframe, can be traded with the stop beyond the wick. A decisive close beyond it often marks a breakout, with the block's extreme becoming the level to watch on any retest.
Rejection Blocks vs Order Blocks
An order block is usually drawn from the last opposite candle before a strong move, often using its body. A rejection block uses only the wick area of a candle that rejected a level. The two can overlap; when they do, the zone has more confluence.
Trading Blocks for 2R: Our Test
This lesson's practical exercise asks whether trades from rejection blocks reach 2R before the stop. JustWolves ran that test mechanically on real data: about six months of 1H candles and two years of daily candles for NIFTY 50, EUR/USD, GBP/USD, USD/JPY and gold, with upper blocks tested on mirrored prices.
Block: a candle whose lower wick was at least half its range, with a range of at least one average candle, making a new 20-candle low. Trade: a buy limit at the block's inner edge on the first return, a stop just below the wick low, and a target of 2R. A stop and target touched in the same candle counted as a loss. As a control, the same trade was placed on a placebo zone one and a half average ranges lower.
| Zone | Trades | Winners | Average per trade |
|---|---|---|---|
| 1H rejection block | 367 | 27% | −0.18R |
| 1H placebo zone | 265 | 25% | −0.25R |
| Daily rejection block | 48 | 25% | −0.25R |
| Daily placebo zone | 33 | 30% | −0.09R |
Taken mechanically, with no other filter, block trades won about a quarter of the time, below the 33% a 2R target needs, and they did not do clearly better than trades from placebo zones. That is consistent with our other zone tests in this course: supply and demand zones and support and resistance levels also held about as often as placebo lines.
So what is a rejection block good for? The Professional Insight below gives the honest answer: every part of the trade is defined by the candle, which makes blocks easy to test and journal. The mechanical version in our test ignored the trend, the higher timeframe and any lower-timeframe trigger. If you trade blocks, those filters are where any edge has to come from, and your own log of at least 50 trades is the only way to know whether your version has one.
Practical Example
Hypothetically, an IT stock falls to support near ₹1,520 and prints a daily candle with a lower wick from ₹1,548 (bottom of the body) to ₹1,512. Kiran marks a lower block from ₹1,512 to ₹1,548.
Eight days later, the stock returns to ₹1,530 and forms a bullish engulfing candle on the hourly chart. Kiran buys at ₹1,542 with a stop at ₹1,506, below the wick low, targeting the swing high at ₹1,650: ₹36 of risk for ₹108 of reward. A daily close below ₹1,512 would have expired the block.
Re-drawing a Block: A Worked Example
Suppose a lower block runs from 1,548 down to 1,512. Price returns and a new candle wicks to 1,520 but closes at 1,551, back above the block. Many traders re-draw the block to the new candle: from its lowest body edge down to its wick low at 1,520. The zone becomes smaller and closer to price, and the stop can move up to just below 1,520.
The trade-off is that a tighter block is easier to break. If the next return closes below 1,520, the re-drawn block has expired, even though the original block's low at 1,512 has not been reached. Decide in advance which version you will use and write it in your rules, so you are not choosing the block that suits your position after the fact.
| What price does | State | Action |
|---|---|---|
| Enters the block, closes inside | Tested | Block valid; look for a trigger |
| Wicks beyond the extreme, closes back inside | Tested deeper | Optionally re-draw to the new wick |
| Closes beyond the extreme | Expired | Stop using the block |
| Never returns | Untested | Remove it once price is far away |
Common Mistakes
- Drawing blocks from wicks that aren't at a level.
- Using the wrong body edge as the inner boundary.
- Trading expired blocks after a close beyond the extreme.
- Stops inside the block instead of beyond the wick.
- Ignoring trend: lower blocks in strong downtrends fail more often.
Professional Insight
The appeal of rejection blocks is that every part of the trade is defined by the candle itself: the zone, the stop and the invalidation. That makes them easy to test and journal. Like any zone method, they work best inside a clear higher-timeframe context.
Risk Considerations
- Long wicks create wide stops; reduce size accordingly.
- Blocks fail, especially against the trend.
- Gaps can open beyond the block.
Important Terminology
| Term | Meaning |
|---|---|
| Rejection block | The wick area of a candle that rejected a level, drawn as a zone. |
| Lower block | From the lowest body edge to the wick low. |
| Upper block | From the highest body edge to the wick high. |
| Re-drawing | Updating the block to a newer wick that tested it. |
| Expiry | A close beyond the block's wick extreme. |
What is a rejection block?
A zone drawn over the wick of a candle that rejected a key level, from the nearest body edge to the wick's extreme.
How do I draw a lower rejection block?
From the lowest body edge of the candle (its open or close) down to the wick low.
Where does the stop go?
Just beyond the wick extreme: below the wick low for a lower block, above the wick high for an upper block.
When does a rejection block stop working?
When a candle closes beyond its wick extreme.
How is a rejection block different from an order block?
An order block is usually the last opposite candle before a strong move; a rejection block uses only the wick area of a rejection candle.
Do rejection blocks work?
Not on their own in our test. On real 1H data, 2R trades from the first return to a rejection block won 27% of the time, below the 33% needed to break even, and about the same as trades from placebo zones. Blocks are useful for defining a trade's structure, but need context and a trigger.
When does a rejection block expire?
When a candle closes beyond the wick extreme. A wick beyond the extreme followed by a close back inside is a deeper test, not an expiry.
Practical Exercise
Track ten blocks.
Your task
Step 1: Mark ten blocks
From prominent wicks at key daily levels.
Step 2: Follow each
Note every return: test, re-draw or expiry.
Step 3: Measure
From a reversal candle in the block, did price reach 2R before the stop?
Check Your Understanding
A lower rejection block is drawn from:
Related Lessons
Previous: Wick Theory. Next: Volume Analysis. See also Order Blocks and Supply and Demand Zones.