
Valid Change of Character: 3 Criteria for Filtering CHoCH Signals
JustWolves is an educational platform and is not a SEBI-registered investment advisor. Trading financial instruments involves significant risk of loss and may not be suitable for all investors. Past performance is not indicative of future results. Read our full disclaimer →
What you'll learn
- CHoCH signals appear often and many fail; filters reduce the number you act on
- Criterion 1: the CHoCH happens at a higher-timeframe supply or demand zone
- Criterion 2: price swept an obvious liquidity level before the CHoCH
- Criterion 3: the CHoCH move is strong, breaking through more than one opposing zone
- Enter on a pullback with a defined stop; the criteria improve context, not certainty
In this article · 16 sections
Change-of-character signals appear on every timeframe several times a day, and many of them lead nowhere. This lesson sets out three filters that SMC traders commonly use to decide which CHoCH signals are worth acting on, and a mechanical way to enter and manage the trade once they're met. Treat the criteria as a checklist to test, not a guarantee.
What You Will Learn
- Why most CHoCH signals shouldn't be traded on their own
- Three criteria for filtering CHoCH signals
- How to choose the zone to enter from after a valid CHoCH
- Entry, stop and target rules
Before You Start
Read Break of Structure vs Change of Character first. Liquidity sweeps and order blocks are covered in depth in modules 02.02 and 02.03.
Why Filter CHoCH Signals?
On lower timeframes, every pullback within a trend can produce a CHoCH. If you trade them all, you're trading against the higher-timeframe trend most of the time. The three criteria below ask: is this CHoCH happening at a meaningful place, after a meaningful event, with meaningful strength?
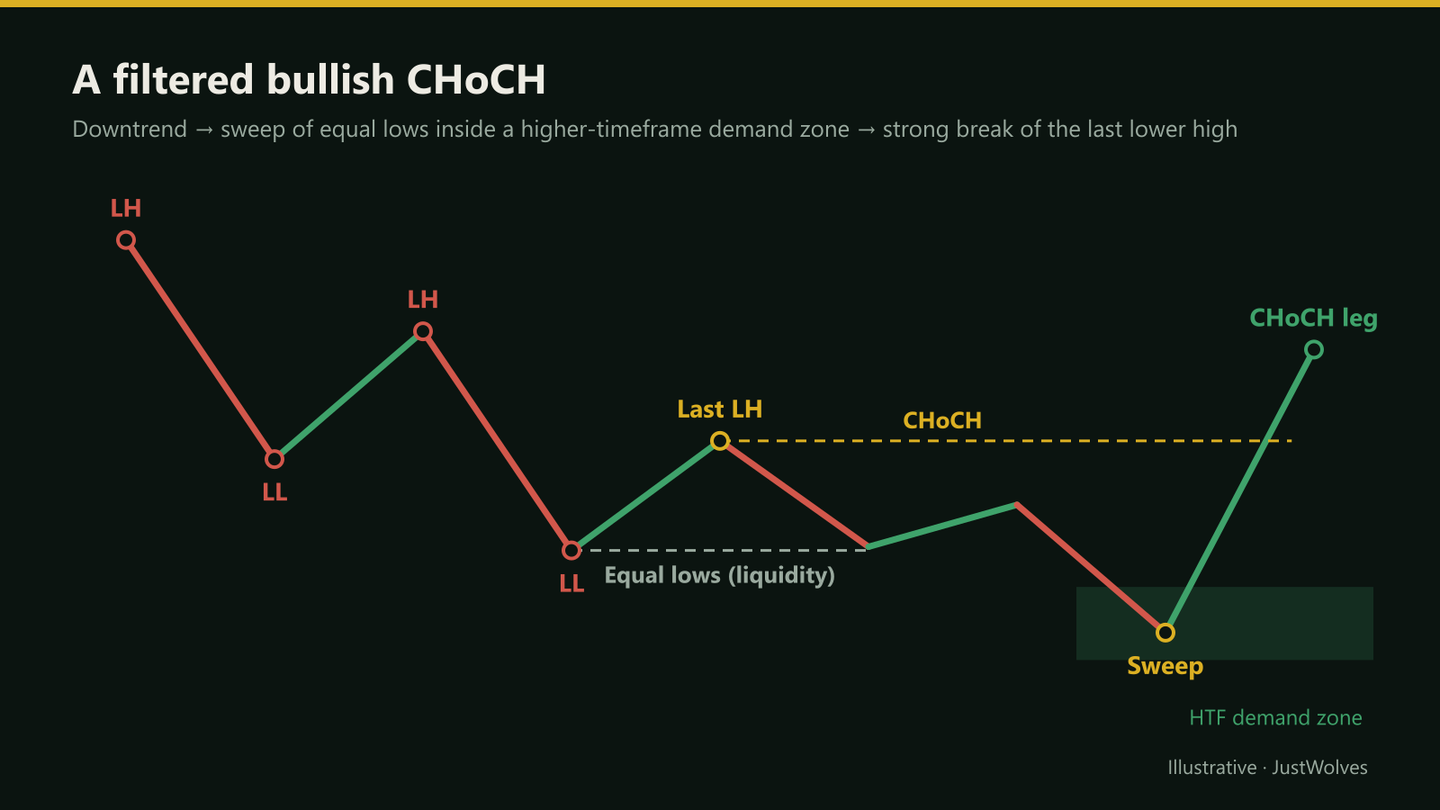
Criterion 1: Higher-Timeframe Zone
The CHoCH should happen when price is reacting from a higher-timeframe zone, such as a 4-hour demand zone for a bullish CHoCH on the 15-minute or 1-hour chart. In SMC terms, the zone should be unmitigated: price hasn't returned to it since it formed.
The logic is simple: a reversal on a lower timeframe is more meaningful if it happens at a level where the higher timeframe has reacted before. A CHoCH in the middle of nowhere is more likely to be just a pullback.
Criterion 2: Liquidity Sweep
Before or during the reaction at the zone, price should trade through an obvious liquidity level, such as equal lows, a clear prior swing low, or a trendline that many traders would watch, and then reverse. That sweep shows that orders resting beyond the level were triggered without price continuing. Lesson 02.02.03 covers sweeps in detail.
Criterion 3: A Strong Break
The CHoCH move itself should be strong: large-bodied candles that close beyond the CHoCH level, often breaking through more than one opposing zone in a single leg. This is sometimes called a double zone breakout: the move clears two supply zones (for a bullish CHoCH) without pausing.
A weak CHoCH that barely closes beyond the level, with overlapping candles, is less convincing. If the move is strong but only breaks one zone, some traders still take the trade at reduced size.
All Three Criteria on One Chart
The chart below follows the worked example in this lesson. Step through it and tick off each criterion as it appears.
A CHoCH that passes all three criteria
Step 1 of 5
Criterion 1: price reaches the higher-timeframe zone
GBP/JPY falls on the 15-minute chart toward a 4H demand zone at 189.20–189.60. Until price is in the zone, no CHoCH counts.
- What to observe
- Mark the zone first.
- Condition
- No zone, no setup.
Which Criteria Mattered in Our Test?
JustWolves tested two of the three criteria on about two years of real 4H candles (EUR/USD, GBP/USD, USD/JPY and gold). We found every change of character, a close beyond the latest swing against the current trend, with swings of two candles each side, and recorded whether the next structure break went in the CHoCH's direction (confirmed) or back the other way. Criterion 1, the higher-timeframe zone, was not part of this mechanical test.
| CHoCH type | Cases | Confirmed by the next break |
|---|---|---|
| All CHoCHs | 513 | 57% |
| After a sweep of the prior extreme | 298 | 57% |
| Without a prior sweep | 215 | 57% |
| Strong break candle (body ≥ 1.5× average) | 334 | 59% |
| Ordinary break candle | 179 | 54% |
| Break left a fair value gap | 318 | 61% |
| No fair value gap | 195 | 50% |
Criterion 3 earned its place: strong breaks, and especially breaks that left a fair value gap, were confirmed more often. A CHoCH with no gap behind it was a coin flip. Criterion 2 did not help in this test: CHoCHs after a sweep were confirmed exactly as often as those without one.
That does not make the sweep useless. It still gives you a logical place for the stop, beyond the sweep extreme, and it may matter more when combined with criterion 1, which we could not test mechanically. But if you must drop a criterion to get more trades, the data says keep the strong break and the gap.
Choosing the Entry Zone
After a strong bullish CHoCH, the leg usually leaves behind two possible demand zones: the extreme zone, at the origin of the move near the sweep low, and a decisional zone higher up, closer to current price.
Many traders prefer the extreme zone. Entering at the decisional zone is closer to price and fills more often, but its stop sits where price is more likely to return. The extreme zone fills less often, but its stop is beyond the sweep low, a level whose break would clearly invalidate the idea.
| Extreme zone | Decisional zone | |
|---|---|---|
| Location | Origin of the CHoCH leg, near the sweep low | Higher, closer to current price |
| Fills | Less often | More often |
| Stop | Beyond the sweep low | Below the decisional zone; more likely to be hit |
| Common preference | Primary entry | Observe, or smaller size |
Step by Step: Trading a Filtered CHoCH
Bullish example
Step 1: Mark the HTF zone
An unmitigated 4-hour demand zone below price.
Step 2: Wait for price to reach it
No trade until it does.
Step 3: Watch for a sweep
Of equal lows or a clear swing low in or near the zone.
Step 4: Confirm the CHoCH
A strong close above the last lower high on your entry timeframe.
Step 5: Place the order
Buy limit at the top of the extreme zone, stop a few pips below the sweep low, target the next HTF supply zone or at least 2R.
Practical Example
Hypothetically, GBP/JPY is falling on the 15-minute chart into a 4-hour demand zone at 189.20–189.60. Price forms equal lows at 189.55, sweeps to 189.31, then rallies in three large candles and closes above the last lower high at 189.95, clearing two small supply zones: all three criteria.
Ishaan places a buy limit at 189.48, the top of the extreme zone, with a stop at 189.18, 13 pips below the sweep low. His target is a 4-hour supply zone at 190.40, about 3R. Price returns to 189.50 but doesn't fill his order, then rallies. He doesn't chase. Missing a trade is part of the plan.
Common Mistakes
- Trading every CHoCH without context.
- Entering before price reaches the HTF zone.
- Calling any dip a sweep. It should be of an obvious level.
- Chasing with market orders when the limit isn't filled.
- Treating three criteria as certainty and oversizing.
Professional Insight
Checklists like this are valuable because they reduce the number of trades, not because they make any single trade certain. Track every setup that meets the criteria, filled or not, so you can measure how the checklist performs on your pairs and timeframes.
Risk Considerations
- Valid-looking setups fail; always use a stop and size for it.
- HTF zones can break in strong trends.
- Limit entries miss some moves; accept that rather than chasing.
Important Terminology
| Term | Meaning |
|---|---|
| Unmitigated zone | A zone price hasn't returned to since it formed. |
| Liquidity sweep | Price trading through an obvious level and reversing. |
| Double zone breakout | A CHoCH leg that breaks through two opposing zones. |
| Extreme zone | The zone at the origin of the CHoCH leg. |
| Decisional zone | A zone higher (or lower) in the CHoCH leg, nearer to price. |
What makes a change of character valid?
In this framework: it occurs at a higher-timeframe zone, after a liquidity sweep, with a strong break, ideally through more than one opposing zone.
Why do many CHoCH signals fail?
Because many are just pullbacks within a higher-timeframe trend, happening away from any meaningful level.
Where do I enter after a CHoCH?
Commonly on a pullback to the extreme zone at the origin of the CHoCH leg, using a limit order.
Where should the stop go?
Beyond the sweep low (bullish) or sweep high (bearish), with a small buffer.
Do these criteria guarantee a reversal?
No. They improve context and reduce the number of trades, but setups still fail.
What makes a CHoCH valid?
This course uses three criteria: price at a higher-timeframe zone, a liquidity sweep, and a strong break. In our 4H data, the strong-break criterion mattered most: CHoCHs whose break left a fair value gap were confirmed 61% of the time, against 50% without a gap.
Does a liquidity sweep make a CHoCH more reliable?
Not on its own in our test: CHoCHs after a sweep of the prior extreme were confirmed 57% of the time, the same as those without. The sweep still provides a logical stop location.
Practical Exercise
Score past CHoCH signals.
Your task
Step 1: Find 20 CHoCH signals
On 15-minute or 1-hour charts.
Step 2: Score each
One point per criterion met: HTF zone, sweep, strong break.
Step 3: Record the outcome
Did price reach 2R before the stop?
Step 4: Compare
Do signals scoring 3 behave differently from those scoring 0–1 in your sample?
Check Your Understanding
Criterion 1 requires the CHoCH to happen:
Related Lessons
Previous: Break of Structure vs Change of Character. Next: Market Structure Shift vs CHoCH. Later: Liquidity Sweep vs Displacement.