
Filtering High-Quality Fair Value Gaps: A 5-Point Checklist
JustWolves is an educational platform and is not a SEBI-registered investment advisor. Trading financial instruments involves significant risk of loss and may not be suitable for all investors. Past performance is not indicative of future results. Read our full disclaimer →
What you'll learn
- Most FVGs on a chart aren't worth trading; filters reduce them to a few
- 1: position: buy FVGs in the discount half of the range, sell FVGs in the premium half
- 2: size: very small gaps relative to the timeframe's normal range are easily ignored by price
- 3: unmitigated only; 4: room to the target with no major level in the way; 5: formed in the move that broke structure
- Large higher-timeframe FVGs can be refined with a smaller gap on a lower timeframe
In this article · 19 sections
Turn on a fair value gap indicator and you'll see dozens of boxes. Most of them will be ignored by price, partly touched, or run straight through. The difference between using FVGs well and badly is mostly filtering. This lesson sets out a five-point checklist commonly used by SMC traders, explains the reasoning behind each point, and shows how to refine large zones.
What You Will Learn
- Why most FVGs shouldn't be traded
- A five-point quality checklist
- How to use the range midpoint to choose FVGs
- How to refine large higher-timeframe FVGs
Before You Start
Read Fair Value Gap (FVG) first. Premium and discount are covered fully in lesson 02.03.06.
The Filtering Rule
1. Position in the Range
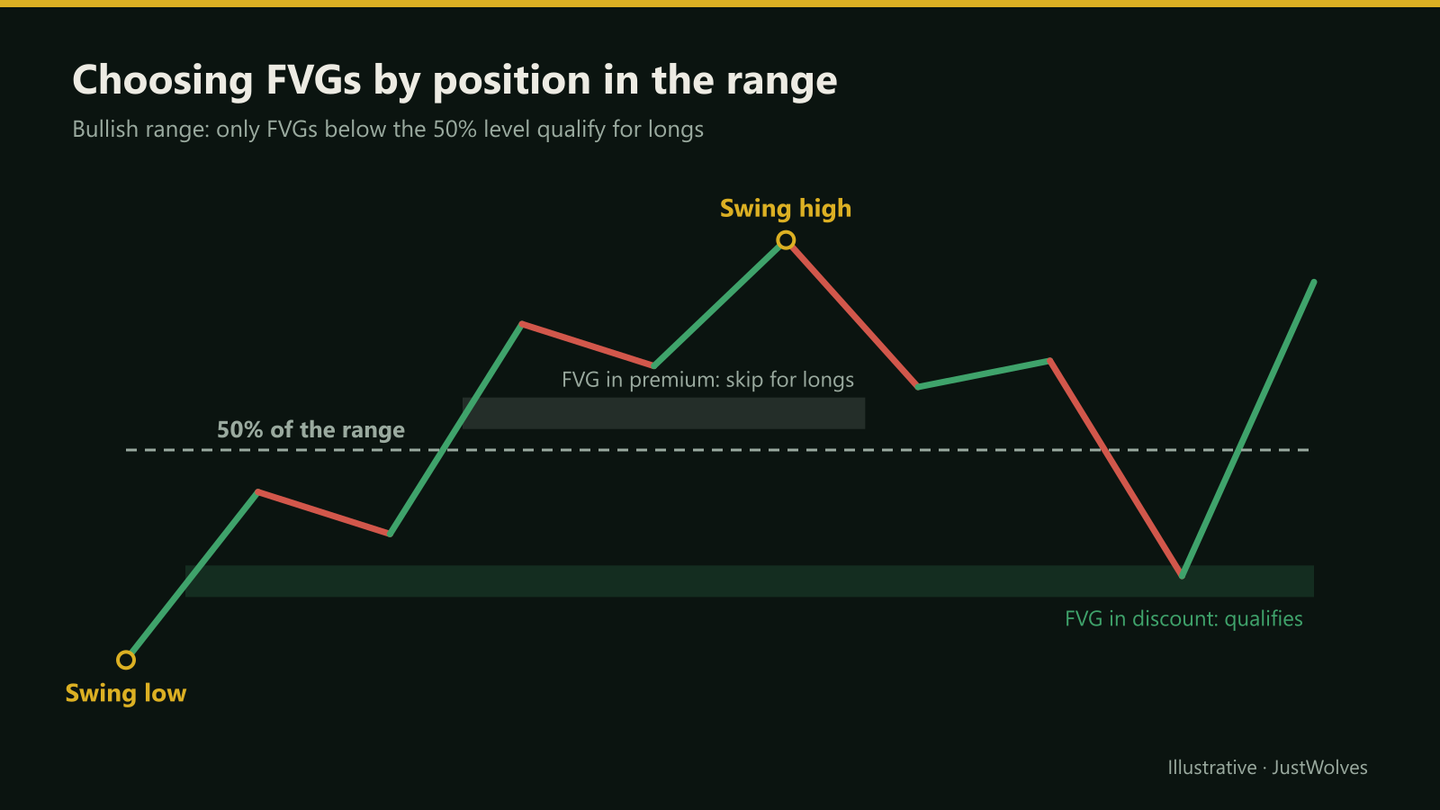
Draw the dealing range from the swing low to the swing high of the move (for a bullish setup) and mark its 50% level. Some material draws this with a box tool and calls it a 'GAN box'; any range tool or a Fibonacci retracement works.
For longs, use only FVGs in the discount half, below 50%. For shorts, use only FVGs in the premium half, above 50%. Buying in discount means your target at the top of the range is further away, improving risk–reward. Where several FVGs qualify, many traders prioritise the deepest one.
2. Size
Very small gaps, a pip or two on a 15-minute chart, are easily overrun by the spread and normal noise. Larger gaps relative to the timeframe's typical candle range reflect a more forceful move. Set a minimum, for example a gap at least a third of the average candle range on your timeframe, and skip anything smaller.
3. Unmitigated Only
Use only FVGs that price hasn't returned to since they formed. If price has already traded into the gap and especially beyond its 50% level, treat it as used. Mark mitigated gaps in grey so you don't trade them by accident.
4. Room to the Target
Before taking a long from an FVG, look up: is there a major resistance level, a higher-timeframe supply zone or an obvious high just above? If the nearest obstacle is closer than your minimum reward (for example 2R), the trade doesn't have room. The same applies in reverse for shorts.
5. Formed in the Move That Broke Structure
The FVGs most often used are those created by the same displacement that produced a break of structure. The break shows the move had enough force to change or continue structure; the FVG marks where that move passed through quickly. A gap inside a slow, choppy leg that broke nothing carries less weight.
The Checklist
| # | Check | Pass if… |
|---|---|---|
| 1 | Position | Discount for longs, premium for shorts |
| 2 | Size | Above your minimum for the timeframe |
| 3 | Unmitigated | Price hasn't returned to it yet |
| 4 | Room | No major level before your minimum reward |
| 5 | Structure | Formed in the move that broke structure |
The Checklist on a Chart
The chart below runs the checklist on three gaps from one rally. Step through it and decide which gap you would trade before the chart shows what happened.
Three gaps, one trade: applying the checklist
Step 1 of 5
A rally leaves three gaps
A 1H rally from 1.0810 to 1.0890 breaks the prior high and leaves three fair value gaps: A (1.0822–1.0830), B (1.0849–1.0864) and C (1.0870–1.0873).
- What to observe
- Three candidates, at different depths and sizes.
- Condition
- Run the checklist on each.
Which Checklist Points Mattered? Our Test
JustWolves tested four of the five points on about six months of real 1H data for EUR/USD, GBP/USD, USD/JPY and gold. We took 1,143 fair value gaps (each at least 30% of an average hourly candle) that price returned to within 48 hours, and recorded whether each held (price moved one average candle away in the gap's direction before closing through it) or failed. Point 4, room to the target, depends on your target and was not tested.
| Feature | Gaps | Held |
|---|---|---|
| All revisited gaps | 1,143 | 60% |
| Size 0.3–0.6 × average candle | 557 | 53% |
| Size 0.6–1.0 × | 344 | 63% |
| Size over 1.0 × | 242 | 74% |
| In discount (longs) / premium (shorts) of the 48-hour range | 459 | 58% |
| On the other side of the range | 684 | 62% |
| Formed in a move that broke the 24-hour extreme | 371 | 61% |
| Not part of such a break | 772 | 60% |
| Second revisit, after holding the first time | 504 | 68% |
The results sort the checklist into one strong point, two weak ones and one surprise:
- Size was by far the strongest factor. Gaps larger than an average candle held 74% of the time, small ones only 53%. Part of this is built in, because a larger gap gives price more room before it counts as failed, but that is also how it works in trading: the stop sits beyond the far edge. Larger gaps also mean wider stops, so size positions accordingly.
- Position in the range made little difference. Gaps on the "right" side of the 48-hour range held no more often than those on the "wrong" side. This matches our dealing-range test, where only the deepest discount showed a small edge.
- Being part of a break of structure made no difference in this test.
- Second revisits held more often, not less. Gaps that had already held once held again 68% of the time. There is a selection effect here, since only gaps that held the first time were counted, but it contradicts the idea that a gap is "used up" after one touch.
The practical message: keep the size rule, test the others on your own market, and do not automatically discard a gap because price has touched it once.
Refining Large FVGs
A daily FVG can be 50–80 pips tall, which makes a stop beyond it very wide. When price enters the daily gap, drop to the 1-hour or 15-minute chart and look for a smaller FVG forming inside it in your direction. Use that as your entry and stop zone, while keeping the daily gap as context. Your stop shrinks, but so does the room for error: expect more stop-outs and size accordingly.
Step by Step: Applying the Checklist
For each candidate FVG
Step 1: Draw the range
Swing low to swing high, with 50%.
Step 2: Run the five checks
Any fail: grey it out.
Step 3: Rank survivors
Deepest in discount (or highest in premium) first.
Step 4: Plan
Entry at the near edge or 50%, stop beyond the far edge, target at least 2R.
Step 5: Wait
Let price come to you; don't chase.
Practical Example
Hypothetically, a 1-hour EUR/USD rally runs from 1.0810 to 1.0890 and breaks the prior high; the 50% level is 1.0850. Three FVGs formed: 1.0872–1.0878 (premium, skip), 1.0846–1.0852 (straddles 50%, skip) and 1.0826–1.0834 (discount, 8 pips, formed in the breaking move, nothing in the way to 1.0890).
Meera places a buy limit at 1.0832 with a stop at 1.0822, targeting 1.0889: 10 pips of risk for 57 pips. The gap passed all five checks; that improves the setup's logic, not its certainty.
Common Mistakes
- Trading premium FVGs for longs because they're closer.
- Ignoring nearby resistance.
- Re-trading mitigated gaps.
- Relaxing the rules after a few losses.
- Refining so far down that stops sit inside normal noise.
Professional Insight
A checklist's value shows up in your records. Log every candidate FVG with pass or fail on each point and the outcome. After 50–100 cases you'll know which filters actually matter on your instruments, which may differ from what any course, including this one, suggests.
Risk Considerations
- All five passing doesn't guarantee a reaction.
- Deep entries fill less often; you'll miss some moves.
- Refined entries have tighter stops and more stop-outs.
Important Terminology
| Term | Meaning |
|---|---|
| Dealing range | The range from a swing low to a swing high (or the reverse). |
| Premium / discount | The upper / lower half of the dealing range. |
| Unmitigated | Not yet revisited by price. |
| Refinement | Using a smaller lower-timeframe zone inside a larger one. |
| GAN box | A name some material uses for a range box with a 50% line. |
How do I choose which FVG to trade?
Filter by position in the range, size, unmitigated status, room to the target, and whether it formed in the move that broke structure.
Should I trade FVGs in premium for longs?
Under this checklist, no. Longs use discount FVGs, below the range's 50% level.
How big should an FVG be?
Set a minimum relative to the timeframe's normal candle range and skip smaller gaps.
What is a GAN box in FVG trading?
A name some material uses for a box drawn over a range with its 50% level, used to separate premium from discount.
Can I refine an FVG on a lower timeframe?
Yes. Inside a large higher-timeframe FVG, look for a smaller lower-timeframe FVG for a tighter entry and stop.
Which fair value gaps are most likely to hold?
In our test of 1,143 revisited 1H gaps, size mattered most: gaps larger than an average candle held 74% of the time, against 53% for small gaps. Premium/discount position and being part of a break of structure made little difference.
Should I only trade unmitigated FVGs?
It is common advice, but in our test gaps that had already held once held again 68% of the time on their second revisit. There is a selection effect, so test it on your own market rather than discarding touched gaps automatically.
Practical Exercise
Filter 20 FVGs.
Your task
Step 1: Collect candidates
20 FVGs on 1-hour charts.
Step 2: Score each
Pass or fail on all five checks.
Step 3: Record outcomes
Did price reach 2R from the gap before the stop?
Step 4: Compare
Gaps passing all five vs the rest, in your sample.
Check Your Understanding
For a long, which FVGs pass the position check?
Related Lessons
Previous: Fair Value Gap (FVG). Next: Order Blocks. See also Premium, Discount and Equilibrium.