
Breaker Blocks and Mitigation Blocks: When Order Blocks Fail
JustWolves is an educational platform and is not a SEBI-registered investment advisor. Trading financial instruments involves significant risk of loss and may not be suitable for all investors. Past performance is not indicative of future results. Read our full disclaimer →
What you'll learn
- A breaker block is an order block that failed after a liquidity sweep and now acts in the opposite direction
- A mitigation block is similar, but the move before the failure didn't sweep the prior high or low
- Both are versions of the classical idea that broken support can become resistance, and vice versa
- Traders use them for retest entries after a break of structure
- The sweep in a breaker makes it the more commonly preferred of the two
In this article · 17 sections
Order blocks don't always hold. When price breaks decisively through one, SMC doesn't simply discard the zone; it often treats it as a new level working in the opposite direction. That flipped zone is called a breaker block or a mitigation block, depending on what happened just before the failure. This lesson explains both, with their classical equivalent, and how traders use them.
What You Will Learn
- What breaker blocks and mitigation blocks are
- How to tell them apart
- The classical idea behind both
- How to trade a retest of a breaker
Before You Start
Read Order Blocks first.
Breaker Block
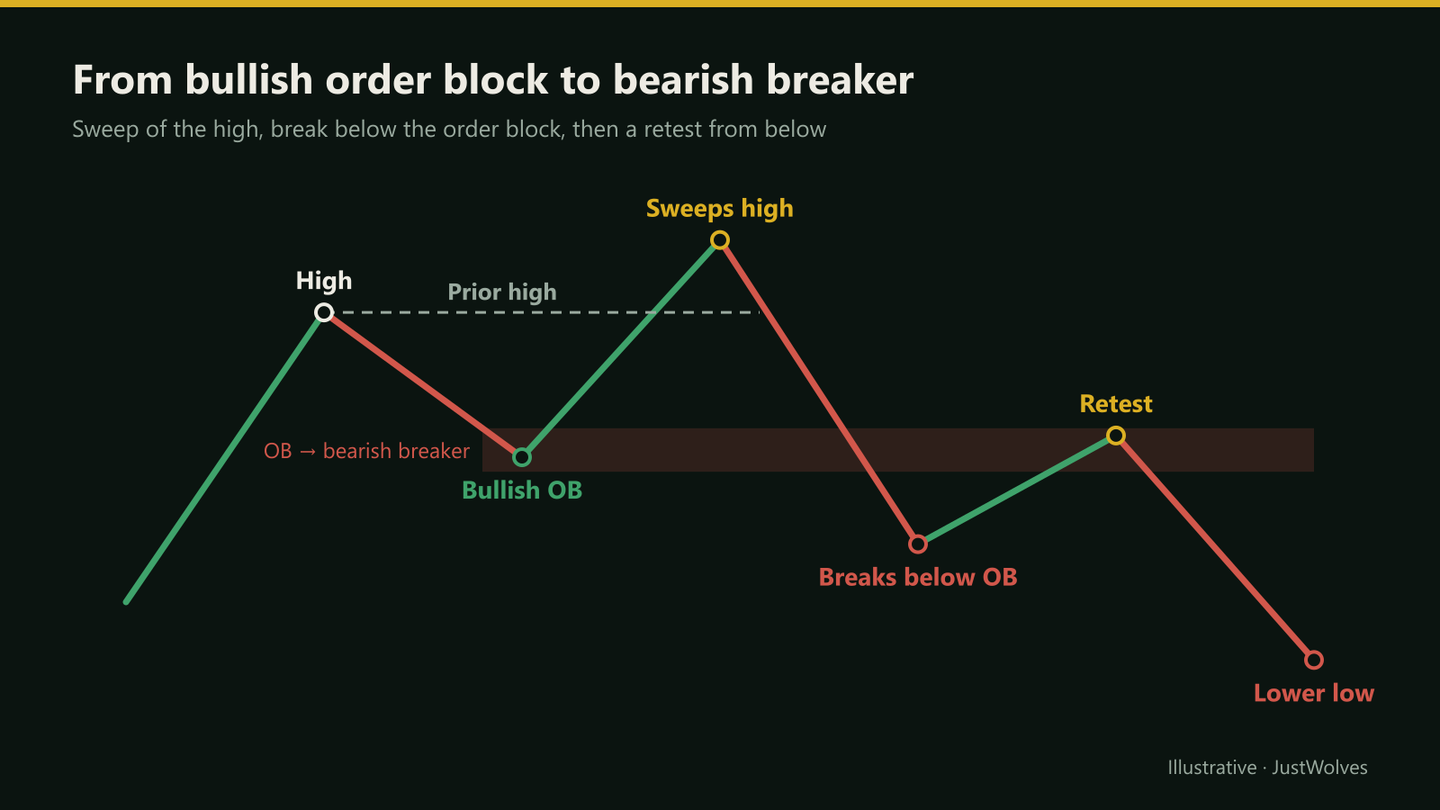
Take a bullish order block in an uptrend. Price rallies from it and makes a new high, sweeping the previous high. Instead of continuing, price falls sharply and closes below the order block, breaking structure to the downside.
The failed bullish OB is now a bearish breaker block. When price rallies back up into it, traders look for shorts. The mirror case, a failed bearish OB after a sweep of a low, becomes a bullish breaker.
Mitigation Block
A mitigation block forms the same way, except that the move before the failure didn't sweep the previous high (or low): price made a lower high, then broke below the order block. The failed zone is again used in the opposite direction. Because there was no sweep, many traders regard it as less significant than a breaker.
| Breaker block | Mitigation block | |
|---|---|---|
| Before the failure | New high that sweeps the prior high | Lower high; no sweep |
| Then | Close below the bullish OB | Close below the bullish OB |
| New role | Resistance on the retest | Resistance on the retest |
| Common preference | Higher | Lower |
A Breaker, Step by Step
The chart below follows the worked example in this lesson: an order block, a sweep, the failure that creates the breaker, and the retest.
A bullish order block fails and becomes a bearish breaker
Step 1 of 5
A bullish order block
The last down candle (1.0835–1.0845) is followed by a rally that breaks structure and makes a high at 1.0880.
- What to observe
- A normal bullish OB.
- Condition
- Expected to act as support.
The Classical Idea Behind Both
Traders have long observed that broken support often becomes resistance, and broken resistance becomes support, an idea called role reversal or polarity. Breakers and mitigation blocks are precise SMC versions of it: they specify which zone, and what had to happen first. The Price Action course covers role reversal in general.
Where Breakers Tend to Work Best
- With the higher-timeframe trend: a bearish breaker in a higher-timeframe downtrend, or after a higher-timeframe CHoCH, has the wind behind it.
- After a clear sweep of an obvious level, such as a previous day high or equal highs, rather than a marginal new high.
- When the break below the order block is decisive, with large-bodied candles and ideally a fair value gap, rather than a slow drift.
- On the first retest. Each later return to the zone is generally treated as weaker, in the same way mitigated order blocks are.
If none of these apply, the failed order block may just be noise inside a range. Skipping those cases is part of using breakers well.
Do Failed Order Blocks Flip? Our Test
JustWolves tested breakers and mitigation blocks on about six months of real 1H candles for EUR/USD, GBP/USD, USD/JPY and gold. Order block: the last opposite candle within five candles before a candle that closed beyond the previous 10-candle high or low. Failure: a later close through the whole zone within 48 hours. We then waited for price to come back to the zone from the other side and recorded whether it was rejected (moved one average candle away) or reclaimed (closed back through the zone). Cases where price had made a new extreme before failing were labelled breakers; the rest, mitigation blocks.
| Type | Cases | Acted as the opposite level |
|---|---|---|
| Breaker (new extreme made before the failure) | 679 | 60% |
| Mitigation block (no new extreme) | 139 | 61% |
Failed order blocks did lean toward role reversal: about six times in ten, the old support acted as resistance (or the reverse) on the retest. That supports the classical idea behind both patterns.
The distinction between breakers and mitigation blocks, however, made no difference in this test. Whether or not price swept a high before the order block failed, the retest behaved the same way. The sweep still matters for where the stop goes, and for the story of trapped traders, but as a filter for which failed zones to trade, it added nothing here. Context, as the section above suggests, is a better place to look for an edge.
Step by Step: Trading a Bearish Breaker Retest
Checklist
Step 1: Identify the bullish OB
And the high it produced.
Step 2: Confirm the sweep
Price made a new high above the prior one, then failed.
Step 3: Confirm the break
A candle closes below the OB's low, breaking structure.
Step 4: Wait for the retest
Price rallies back into the old OB zone.
Step 5: Enter short
Ideally on a lower-timeframe bearish CHoCH inside the zone; stop above the zone or the sweep high; target the next sell-side liquidity.
Practical Example
Hypothetically, EUR/USD on the 1-hour chart rallies from a bullish OB at 1.0835–1.0842, makes a high at 1.0880, then pushes to 1.0889 (sweeping it) before falling hard and closing at 1.0828, below the OB.
Lakshmi now treats 1.0835–1.0842 as a bearish breaker. When price rallies back to 1.0840 and a 5-minute bearish CHoCH forms, she sells at 1.0838 with a stop at 1.0850, targeting equal lows at 1.0800: 12 pips of risk for 38 pips.
A Breaker Checklist
Before trading a breaker or mitigation block retest, check each line:
- Was it a real order block? A clear opposite candle before a move that broke structure, not any candle that happens to sit below a rally.
- Did a candle close through the whole zone? A wick through is not a failure.
- Is the retest the first one? Later retests were not part of our test; treat them with more caution.
- Does the higher timeframe agree? A bearish breaker in a higher-timeframe downtrend has context on its side.
- Is the stop beyond the far side of the zone, and the size set for it?
Our test suggests that whether a sweep came first matters less than these basics.
The Psychology of the Retest
A breaker retest asks you to sell where, a few hours earlier, you may have been buying. That reversal of view is uncomfortable, and many traders hesitate until the move has gone. Writing the plan as soon as the order block fails, before price returns, makes the decision when it is easy rather than at the retest, when it feels hardest.
Common Mistakes
- Calling any failed zone a breaker without the sweep.
- Entering before the retest.
- Stops inside the breaker zone.
- Trading breakers against a strong higher-timeframe trend.
- Confusing breakers with mitigation blocks and sizing them the same.
Professional Insight
The logic traders find appealing is that the breaker contains a story: a sweep that drew buyers in, a failure that trapped them, and a retest where some of those traders may exit near breakeven. Whether or not that's what happens, the pattern gives a clear location and a clear stop, which is what makes it tradeable and testable.
Risk Considerations
- Breakers fail too, sometimes reclaiming the zone and continuing up.
- Retests may not come; strong moves can leave without one.
- Lower-timeframe breakers are noisier.
Important Terminology
| Term | Meaning |
|---|---|
| Breaker block | A failed order block, after a sweep, used in the opposite direction. |
| Mitigation block | A failed order block without a prior sweep, used in the opposite direction. |
| Role reversal | Broken support becoming resistance, or vice versa. |
| Retest | Price returning to a broken zone. |
| Sweep | Price trading beyond a prior high or low and failing to hold. |
What is a breaker block?
An order block that failed after price swept a prior high or low, and is then used as a zone in the opposite direction.
What is a mitigation block?
A failed order block where the move before the failure didn't sweep the prior high or low.
What is the difference between a breaker and a mitigation block?
The sweep: a breaker forms after a sweep of the prior extreme; a mitigation block forms without one.
How do I trade a breaker block?
Wait for price to retest the failed zone, look for a lower-timeframe confirmation, and place the stop beyond the zone.
Is a breaker block the same as support turning into resistance?
It's a specific SMC version of that classical idea.
Do breaker blocks work?
They lean the right way. In our test of 679 breakers on real 1H data, the failed zone acted as the opposite level on retest 60% of the time. That is a lean, not a certainty, so stops and position size still matter.
Is a breaker better than a mitigation block?
Not in our test. Mitigation blocks (no sweep before the failure) acted as the opposite level 61% of the time, essentially the same as breakers at 60%.
Practical Exercise
Find breakers and mitigation blocks.
Your task
Step 1: Find ten failed OBs
On 1-hour charts.
Step 2: Classify each
Breaker (sweep first) or mitigation block (no sweep).
Step 3: Track retests
Was there a retest, and did it hold?
Step 4: Compare
Did breakers behave differently from mitigation blocks in your sample?
Check Your Understanding
A bullish OB fails after price sweeps the prior high. The zone becomes a:
Related Lessons
Previous: Order Blocks. Next: Premium, Discount and Equilibrium. See also the Price Action course for role reversal.