
Advanced CISD: AMD, Order Blocks and Standard-Deviation Targets
JustWolves is an educational platform and is not a SEBI-registered investment advisor. Trading financial instruments involves significant risk of loss and may not be suitable for all investors. Past performance is not indicative of future results. Read our full disclaimer →
What you'll learn
- In AMD terms, a CISD often marks the end of the manipulation and the start of distribution
- The order block is the last candle of the failed delivery, before the CISD candle
- Standard-deviation projections measure the manipulation range and project it as targets
- A top-down workflow (daily → 1-hour → low timeframe) gives context, setup and trigger
- Projection targets are a consistent method, not levels price is bound to reach
In this article · 17 sections
Lesson 03.03.01 treated CISD as a trigger. This lesson builds it into a complete model: locate the manipulation phase of Power of Three, confirm its failure with a CISD, enter from the order block the CISD leaves behind, and set targets with standard-deviation projections of the manipulation. It's a precise, rule-based sequence, which is exactly what makes it worth testing before trusting.
What You Will Learn
- How CISD fits the accumulation–manipulation–distribution model
- How to identify the order block a CISD creates
- How to calculate standard-deviation projection targets
- A three-timeframe workflow and the 'box' setup
Before You Start
Read Change in State of Delivery and Power of Three (AMD) first.
Where CISD Sits in AMD
- Accumulation: a range forms; equal highs or lows build up at its edges.
- Manipulation: price breaks out of the range aggressively, taking that liquidity, then returns inside. The first candle of that breakout is the origin point.
- CISD: a candle closes back through the origin, confirming the breakout failed.
- Distribution: the real move in the opposite direction; the target zone for the trade.
The Order Block a CISD Leaves
In this model, the order block is the candle immediately before the CISD candle: the last candle of the failed delivery. Draw it from its open to its close (body), and extend it to the right.
After the CISD, price often retraces into that candle's range. A limit order there gives a precise entry with a stop just beyond the manipulation extreme.
Standard-Deviation Projections
ICT-derived material sets targets by projecting the manipulation range. Measure the distance from where the manipulation started (the range boundary) to its extreme. That distance is one 'standard deviation' unit in this context; it's a projection of a price distance, not a statistical standard deviation.
Project multiples of that distance from the range boundary in the direction of the expected move. Common reference targets are −1, −2 and −2.5, with −2 often treated as a primary target.
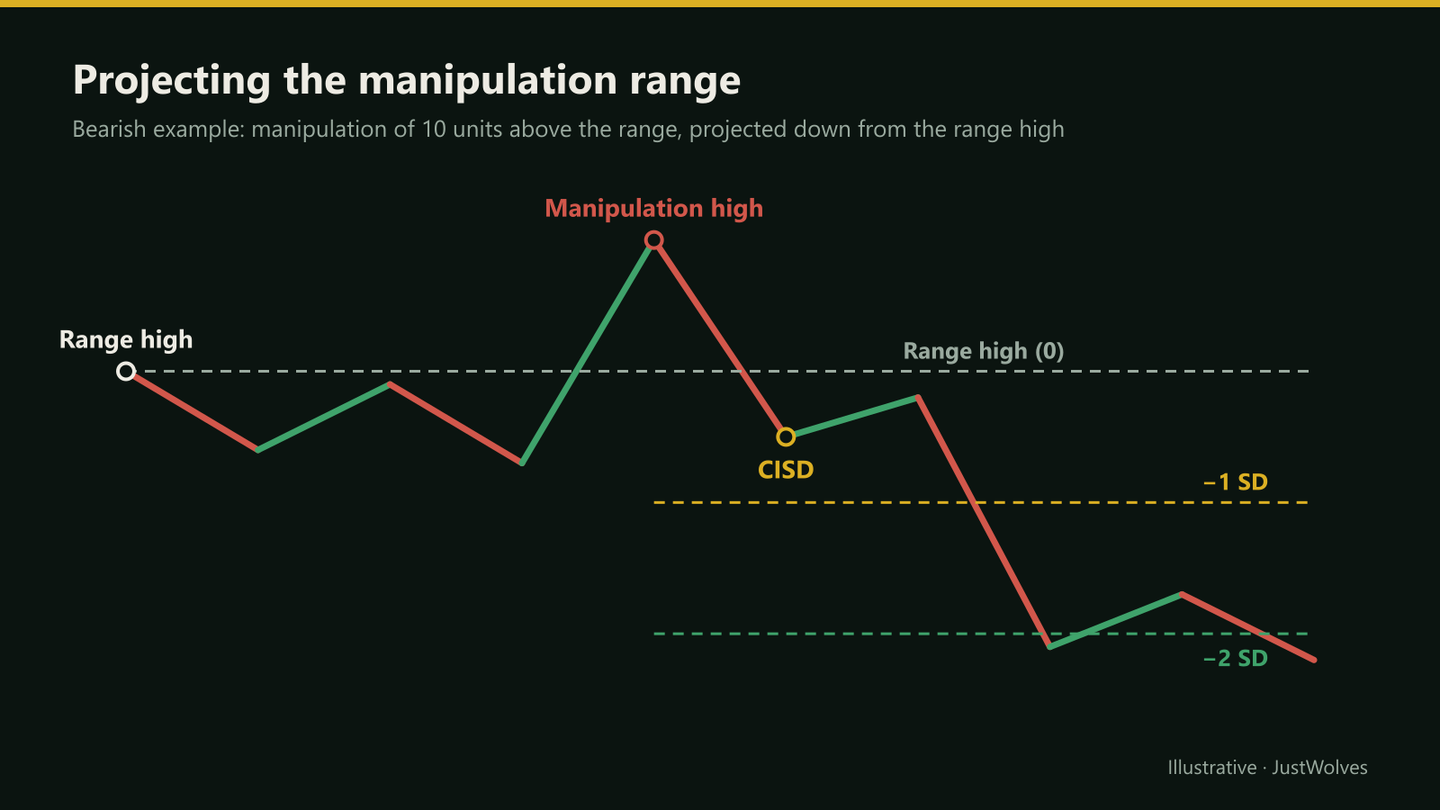
Use projections alongside liquidity targets. If the −2 projection lines up with the previous day low or an old low, that's a stronger target than either alone.
The Whole Sequence on One Chart
The chart below combines the three ideas in this lesson: accumulation and manipulation, the CISD and the order block it leaves, and projection targets measured from the manipulation.
CISD inside AMD, with an order block and projection targets
Step 1 of 5
Accumulation
Price ranges between 1.2733 and 1.2750 at a daily bearish FVG. Buy stops build above the range high.
- What to observe
- A tight range at a higher-timeframe level.
- Condition
- Bias: bearish.
A Three-Timeframe Workflow
Daily → 1-hour → low timeframe
Step 1: Daily
Bias and the key PD array price is approaching.
Step 2: 1-hour
When price reaches the array, look for an accumulation range and a manipulation through one side.
Step 3: Low timeframe (5- or 2-minute)
Mark the origin of the manipulation run; wait for the CISD.
Step 4: Entry
Limit in the CISD order block; stop beyond the manipulation extreme.
Step 5: Targets
−1 SD for partials, −2 SD or the nearest liquidity for the rest.
The Box Setup
A related pattern: mark the accumulation range as a box and note the highest (or lowest) candle body inside it. After a manipulation breaks out of the box and a CISD brings price back inside, enter when price retests the box edge, with a stop beyond the manipulation extreme. It's the same logic framed around the range rather than the order block.
Choosing the Trigger Timeframe
The lower the trigger timeframe, the tighter the stop and the more CISDs you will see, most of them noise. Many traders start with the 5-minute chart and only drop to 2- or 1-minute once their results on 5-minute are understood. Whatever you choose, measure the manipulation range and draw projections on the same timeframe you trade, and avoid triggers in the few minutes around major news, when spreads widen and ranges are distorted.
Practical Example
Hypothetically, GBP/USD reaches a daily bearish FVG. On the 1-hour chart, a range forms with a high at 1.2750. Price spikes to 1.2770 (manipulation of 20 pips), then on the 5-minute chart a candle closes below the open of the spike's first candle at 1.2753: a CISD.
The order block, the last up-candle before the CISD, spans 1.2758–1.2764. Neha sells at 1.2758 with a stop at 1.2774. Projections from the range high: −1 SD = 1.2730, −2 SD = 1.2710, close to the previous day low at 1.2708. She takes half at 1.2730 and targets 1.2710 with the rest: 16 pips of risk, 28 and 48 pips of reward.
CISD After a London Sweep: Our Test
The AMD-plus-CISD idea is often taught as London sweeping the Asian range (manipulation) and then a CISD confirming the reversal (distribution). JustWolves tested a mechanical version on about six months of real 1H data for EUR/USD, GBP/USD, USD/JPY and gold. Rule: London (02:00–05:00 New York) trades beyond exactly one side of the Asian range (20:00–00:00); before noon New York, a candle closes back through the open of the last run of at least two opposite candles (the CISD); entry at that close, stop beyond the sweep extreme, target the other side of the Asian range. Costs were excluded.
| Measure | Result |
|---|---|
| Setups | 55 |
| Winning trades | 33% |
| Average per trade | −0.39R |
The mechanical version did poorly: only a third of trades reached the other side of the Asian range, and the average loss was more than a third of the risk per trade. The sample is small, but the direction is consistent with our other tests: London sweeps of the Asian range more often led to continuation than to reversal, and raw CISDs predicted the next 12 hours no better than chance.
This lesson's additional ingredients, a daily PD array as the location and entry at the order block rather than the CISD close, were not part of the test. If you use this model, those are the parts that have to carry the edge, so log them separately and compare against the plain version above.
The Psychology of Waiting for the Order Block
This model asks for patience twice: first to let the manipulation finish, then to let price come back to the order block after the CISD. The chart above shows the cost of the second wait, a move that never returned. It is tempting to chase with a market order when that happens. Decide before the session whether you ever enter at market after a CISD, and stick to it; mixing both entries makes your results impossible to read.
Common Mistakes
- Measuring the wrong range for projections.
- Treating projections as certain targets.
- Choosing the wrong order block candle.
- Using the model without a daily level.
- Running it on very low timeframes where costs swamp the edge.
Professional Insight
Projection methods are common in trading: measured moves in classical charting do much the same thing. Their value is consistency, giving every trade a target decided before entry. Whether −2 is a better target than −1 for your pair is an empirical question your backtest can answer.
Risk Considerations
- Manipulations can continue, turning into breakouts.
- Low-timeframe entries are sensitive to spread and slippage.
- Distant projection targets reduce the hit rate.
Important Terminology
| Term | Meaning |
|---|---|
| Manipulation range | The distance from the range boundary to the manipulation extreme. |
| Standard-deviation projection | Multiples of the manipulation range projected as targets. |
| CISD order block | The last candle of the failed delivery, before the CISD candle. |
| Box setup | A re-entry into the accumulation range after a failed breakout. |
| Distribution | The main move after manipulation. |
How does CISD relate to AMD?
A CISD often marks the point where the manipulation phase fails and distribution begins.
What are standard-deviation projections in ICT?
Multiples of the manipulation range, measured from the range boundary, used as price targets.
Which candle is the CISD order block?
The candle immediately before the CISD candle: the last candle of the failed delivery.
Is −2 standard deviations always reached?
No. Projections are consistent targets, not guarantees; combine them with liquidity levels.
Which timeframes suit this model?
A common stack is daily for context, 1-hour for the setup and 5- or 2-minute for the trigger.
Does CISD after a London sweep work?
In our mechanical test on six months of real 1H data, a London sweep of the Asian range followed by a CISD won 33% of the time and averaged −0.39R per trade before costs (55 setups). Higher-timeframe location and better entries would have to provide any edge.
Do I need AMD to trade CISD?
No. CISD can be used as an entry trigger on its own, at a level you have already marked. AMD adds a timing framework, accumulation then manipulation then distribution, which some traders find helps them wait for the right part of the session. Test each version separately.
Practical Exercise
Test projection targets.
Your task
Step 1: Find 15 AMD sequences
With a CISD after the manipulation.
Step 2: Measure and project
−1, −2 and −2.5 for each.
Step 3: Record
Which projections were reached before the manipulation extreme was retaken?
Step 4: Decide
Which target level suits your pair best?
Check Your Understanding
In AMD, a CISD usually confirms:
Related Lessons
Previous: Change in State of Delivery. Next: The ICT Silver Bullet Setup. See also Power of Three (AMD).