
Reclaim, Rejection and Continuation of a Range
JustWolves is an educational platform and is not a SEBI-registered investment advisor. Trading financial instruments involves significant risk of loss and may not be suitable for all investors. Past performance is not indicative of future results. Read our full disclaimer →
What you'll learn
- A reclaim is price moving back inside C1's range and holding there
- After a reclaim, price can reject at the midpoint, reach the opposite side, or continue beyond it
- Retests of the swept level from inside are common and can offer entries
- Rejection at the midpoint or the opposite side is a reason to take profit or tighten stops
- Continuation beyond the range is most likely when the setup aligns with the higher-timeframe trend
In this article · 17 sections
A valid C2 is only the start. Once price reclaims C1's range, several things can happen: it can stall at the middle, travel to the other side and stop, or break through and keep going. Each outcome calls for different management. This advanced lesson describes the typical paths after a reclaim and how to handle each one.
What You Will Learn
- What a range reclaim is
- Retests of the swept level
- Rejection at the midpoint and the opposite side
- Continuation beyond the range
Before You Start
Read Candle Range Sweeps and False Breaks first.
The Reclaim
A reclaim is the move back inside C1's range after the sweep. In a bullish case, C2 closes above CRL, and the market is said to have reclaimed the range.
A reclaim that holds, with C3 and the following candles staying above CRL, supports the setup. A reclaim that's quickly lost, with a close back below CRL, weakens it.
Retests of the Swept Level
After reclaiming, price often comes back to test CRL from above. If it holds there, the retest offers a lower-risk entry than the start of C3, with a tighter stop. If it breaks back below CRL and closes there, the reclaim has failed.
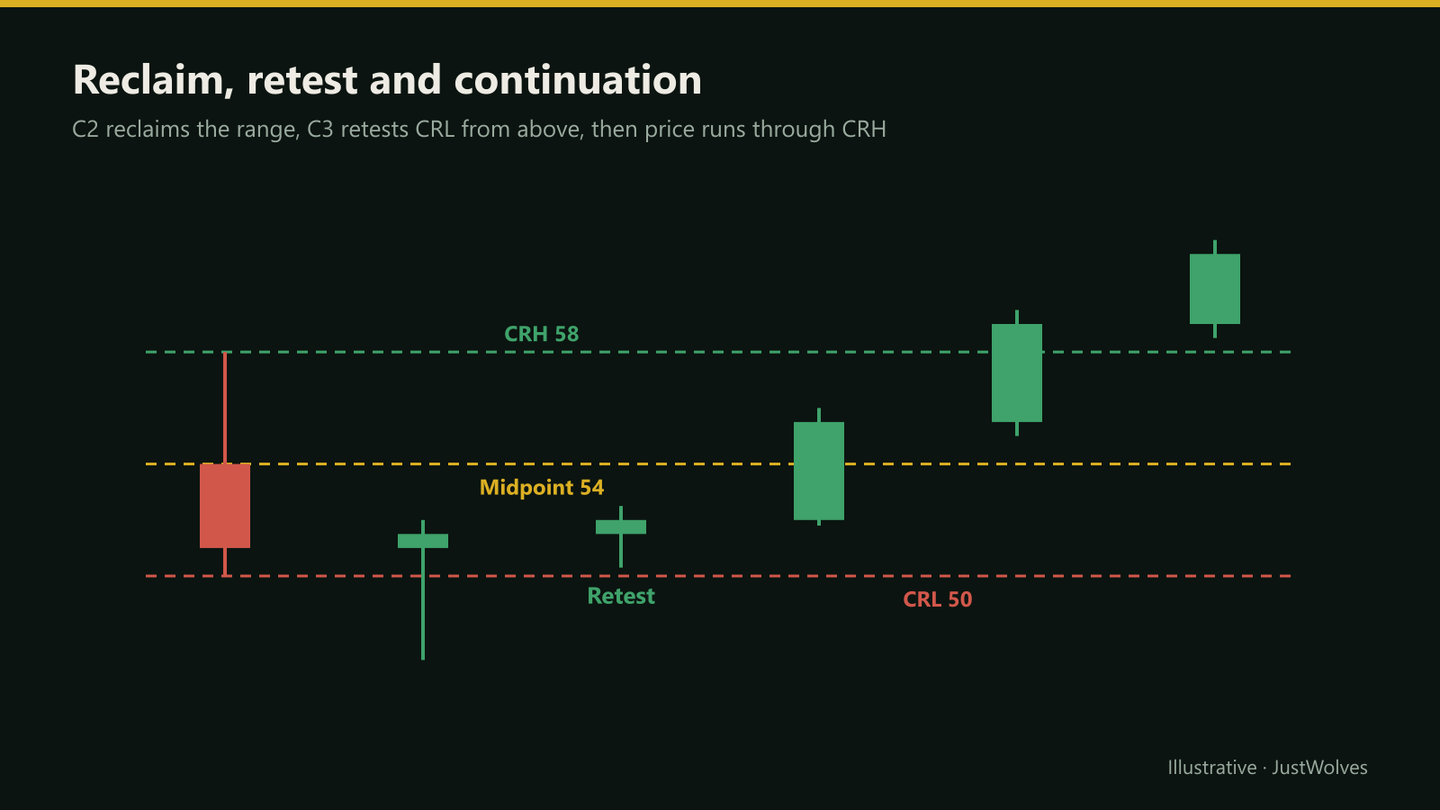
Three Paths After a Reclaim
| Path | What happens | Typical response |
|---|---|---|
| Midpoint rejection | Price stalls near C1's midpoint and turns down | Partial profit; tighten stop; exit if CRL is lost |
| Opposite-side rejection | Price reaches CRH and is rejected | Take main profit at CRH |
| Continuation | Price closes above CRH and keeps going | Trail the remainder; CRH may become support |
How Often Each Path Happens
Knowing the paths is useful. Knowing how often each one happens is what lets you plan sensibly. JustWolves classified 830 real 4H CRT setups (EUR/USD, GBP/USD, USD/JPY and gold, May–November 2026) by what price did during C3 and C4, the eight hours after C2 closed. We used hourly candles to see the order of events.
| Path in C3–C4 | Share of setups |
|---|---|
| Failed reclaim: a close back beyond the swept level before reaching the midpoint | 35% |
| Reached the midpoint but not the opposite side | 26% |
| Reached the opposite side of C1 | 17% |
| Went well beyond (at least half a C1 range past the opposite side) | 20% |
| Drifted without reaching the midpoint or failing | 3% |
The most common single outcome was a failed reclaim, at about a third of setups. Only 37% reached the opposite side of C1 at all, though when they did, more than half kept going well beyond it.
These numbers make the case for the "plan for all three" approach in practical terms:
- A rule to exit early on a close back beyond the swept level matters, because that is the most frequent outcome.
- A partial at the midpoint pays something on the quarter of setups that stall there.
- A runner beyond the opposite side is how you benefit from the one setup in five that turns into a real move.
What Favours Continuation
- Trend alignment: the CRT is in the direction of the higher-timeframe trend.
- Room: no major resistance just beyond CRH.
- Momentum: strong C3 and C4 candles closing near their highs.
- Session: the move happens as a more active session opens.
When the Reclaim Fails
If price closes back below CRL after reclaiming it, the market has rejected the range from inside and may now break down. Many traders exit at that point rather than waiting for the stop below C2's low, accepting a smaller loss when the setup's logic has broken.
Reading the Candles After the Reclaim
The first two or three candles after C2 usually reveal which path is developing. Strong candles closing near their highs, each above the last, suggest momentum toward CRH and possibly beyond. Small, overlapping candles drifting around the midpoint suggest the market has lost interest and a midpoint rejection is more likely.
A long upper wick into the midpoint or CRH, followed by a close lower, is an early sign of rejection at that level. Many traders use that as their cue to take partial profit rather than waiting for price to come back toward the entry.
Read the Decision Points Step by Step
The chart below shows the best-case path, a reclaim that holds, crosses the range and continues, with each decision level marked. As you step through, ask what you would do at each level if price had turned there instead.
From reclaim to continuation: reading each decision point
Step 1 of 6
Four decision levels
C1 gives four levels: CRL (37.60) for validity, the midpoint (38.70) for strength, CRH (39.80) for the main target, and anything beyond for continuation.
- What to observe
- Each level has a job.
- Condition
- Decide what you will do at each before C2 closes.
The Opposite Side as New Support or Resistance
If price closes beyond the opposite side of C1's range and then pulls back to it, that level often behaves like broken resistance turned support, just as in ordinary support and resistance. A pullback that holds there is a common place to add to a position or to move the stop, while a close back inside the range suggests the continuation has failed.
Practical Example
Hypothetically, Nifty's 1-hour C1 spans 24,000–24,080, with a midpoint of 24,040. C2 sweeps to 23,970 and closes at 24,015. C3 dips to 24,003, holding above CRL, and closes at 24,030. Rahul buys at 24,032 with a stop at 23,965.
He takes a third off at the midpoint, 24,040, and a third at CRH, 24,080. Nifty closes above 24,080 on the next candle and runs to 24,150; he trails the last third and exits at 24,130.
The Psychology of the Middle of the Range
Most of the frustration in CRT trading happens around the midpoint. A trade that reaches the middle of C1 feels like it is working, and when price stalls and drifts back, it is tempting to move the stop, cancel the partial or hold on in hope. In our data, about a quarter of setups did exactly this: reached the midpoint and went no further within two candles.
Decide in advance what the midpoint means for you: a partial exit, a stop move, or nothing. Then apply the same rule every time. The aim is not to find the perfect response to each trade. It is to make sure the response to the most common situations is already decided.
Common Mistakes
- Holding the whole position for continuation that may not come.
- Ignoring a failed retest of CRL.
- Exiting everything at the midpoint in a strong trend.
- Moving stops too early into the noise of the retest.
- No plan for each path.
Professional Insight
Experienced traders treat each part of C1's range as a decision point: CRL for validity, the midpoint for strength, CRH for the main target, and beyond for continuation. Mapping actions to those levels in advance makes management mechanical.
Risk Considerations
- Reclaims can fail after retests.
- Midpoint stalls reduce reward.
- Continuation can reverse sharply at higher-timeframe levels.
Important Terminology
| Term | Meaning |
|---|---|
| Reclaim | Price moving back inside C1's range after a sweep. |
| Retest | A return to the swept level from inside the range. |
| Midpoint rejection | Price stalling and turning at C1's midpoint. |
| Continuation | Price moving beyond the opposite side of C1's range. |
| Scaling out | Exiting a position in parts at different levels. |
What is a range reclaim?
Price moving back inside a candle's range after sweeping beyond it, and holding there.
Should I enter on the retest of CRL?
It can offer a tighter stop than entering at C3's open, if the level holds.
What if price stalls at the midpoint?
Many traders take partial profit and tighten their stop, exiting if CRL is lost.
When does price continue beyond the range?
More often when the setup aligns with the higher-timeframe trend and there's room beyond the opposite side.
What does a failed reclaim look like?
A close back beyond the swept level after initially reclaiming the range.
How often does a CRT reclaim fail?
In our test of 830 real 4H setups, about 35% closed back beyond the swept level before reaching C1's midpoint during C3 and C4. That was the single most common outcome.
How often does CRT continue beyond the range?
About 20% of setups in our test went at least half a C1 range beyond the opposite side within two candles. Planning a runner is how traders benefit from those, while partial exits cover the more common shorter moves.
Practical Exercise
Track post-reclaim paths.
Your task
Step 1: Find twenty valid CRT setups
On one market and timeframe.
Step 2: Classify the path
Midpoint rejection, opposite-side rejection, continuation or failed reclaim.
Step 3: Note context
Trend alignment for each.
Step 4: Plan exits
Which scaling plan would have handled your sample best?
Check Your Understanding
A reclaim in a bullish CRT is:
Related Lessons
Previous: Candle Range Sweeps and False Breaks. Next: Bullish and Bearish CRT Setups.